
BIG WEEK
by Erwin DeMooy
The week of 20 – 26 February, 1944, may well be classed
by future historians as marking a decisive battle of history,
one as decisive and of greater importance than Gettysburg.
General Henry H. “Hap” Arnold,
Commanding General of the USAAF
Big week or operation Argument was a sequence of raids on German aircraft factories during the week of February 20 to 25 1944. It was also a way to get the Luftwaffe into the air and destroy or weaken them. Air superiority was needed to stop the brutal slaughter taking place in the sky and for future operations like ‘Operation Overlord’. Air superiority was needed.
The bombers were expected to defend themselves but after missions like the Schweinfurt-Regensburg mission on August 17th 1943 (60 aircraft were lost and 87 had to be scrapped) and the Second raid on Schweinfurt on October 14th 1943, also known as Black Thursday, (60 aircraft were lost and 17 had to be scrapped) the command saw that something needed to change. Daylight missions were cancelled to rebuild the forces.
By the early spring of 1944 bombers were being escorted by the long range P-38 Lightning and later by the P-51 Mustang on massive raids on fighter factories. Because of the massive raids the Germans had no other choice then to react and send fighters into the air to attack the bombers. First the fighters had to stay with the bombers and protect them but the Americans changed their tactics and fighters were now send ahead of the bombers. The Germans by this time were still using their old good working tactics but increased their fighters armaments making them heavier and easier targets for the new and powerful Mustangs. The US claimed 500 German fighters destroyed but these numbers were way to high. Although the number of destroyed German fighters was high the Germans did lose 100 skilled pilots during Big Week and with the war in the East it was becoming more difficult to train new pilots. The US lost 97 B-17’s, 40 B-24’s and another 20 had to be scrapped. The RAF lost 131 bombers.
The missions on fighter factories ended officially on April 1st 1944 and it is debatable if Operation Big Week had any effect on the building process of fighters. Mid 1944 the production of German fighters was at a peak. What did help was the confidence that the Operation created and the new tactics (by Doolittle) of ‘freeing the fighters’. Although there were still a lot of German fighters to deal with the Americans and English were now getting the better side of air superiority.
MISSION
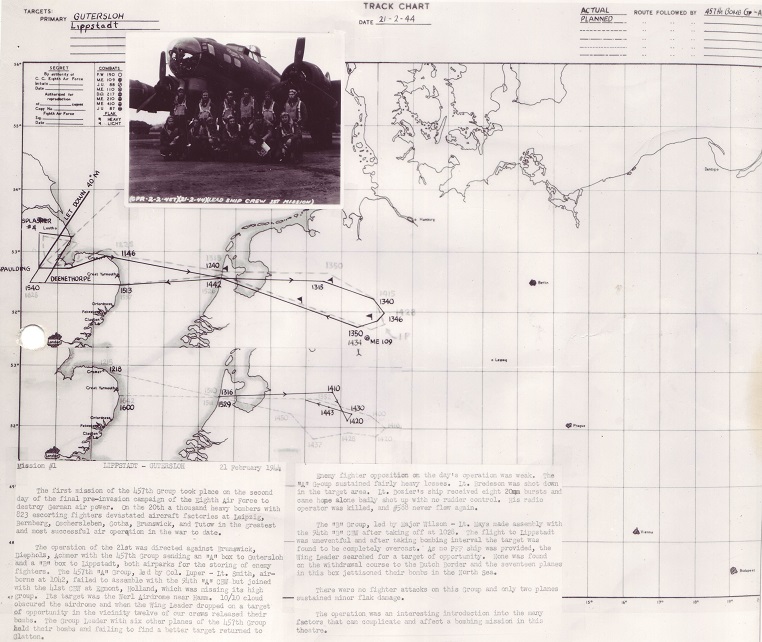
On February 21st 1944, the second day of Big Week, a total of 861 heavies were send back into Germany to bomb 6 airfields at Diepholz, Gütersloh, Lippstadt, Werl, Achmer and Handorf. Also included as primary target were the industrial areas of Brunswick city. Escort on this mission was provided by 69 P-38s, 542 P-47s and 68 P-51s.
336 B-17s are dispatched to the Gutersloh, Lippstadt and Werl Airfields; because of thick overcast, 285 hit Achmer, Hopsten, Rheine, Diepholz, Quakenbruck and Bramsche Airfields and the marshaling yards at Coevorden and Lingen; they claim 12-5-8 Luftwaffe aircraft; 8 B-17s are lost, 3 damaged beyond repair and 63 damaged; casualties are 4 KIA, 13 WIA and 75 MIA. 2.
1st Bomb Division (1st, 40th, 41st and 94th Combat Wing): A combined force of 336
B-17s from: 91BG; 92BG; 303BG; 305BG; 306BG; 351BG; 379BG; 381BG; 384BG; 401BG; 457BG and 482BG are detached to the primary German airfield targets at Gütersloh; Lippstadt and Werl, Germany. When arriving at the designated targets cloud cover obscures these targets and the formations seek out Targets of Opportunity (TOs). 285 aircraft are effective on the following airfields as Targets of Opportunity (TOs): Achmer, Hopstein, Rheine, Diepholz, Quackenbruck and Bramsche. In addition, the railroad marshalling yards at Coevorden and Lingen, Germany are bombed as Targets of Opportunity (TOs). This is the first combat mission for 457BG.
1st Bomb Division lost a total of 9 aircraft and 63 damaged aircraft. The 1st division also had 28 men killed in action, 60 men were taken as prisoners of war and 14 were wounded in action. 5 men were rescued from the North Sea by ASR (Air-Sea Rescue).
2nd Bomb Division (2nd, 14th, 20th and 96th Combat Wing): A combined force of 244 B-24s from: 44BG; 93BG; 389BG; 392BG; 445BG; 446BG; 448BG and 453BG are dispatched to bomb the airfields of Achmer and Handorf, Germany. 11 aircraft managed to bomb the airfield at Achmer using PFF equipment; 203 others bomb the airfields at Diepholz, Vörden and Hesepe, Germany and the industrial areas of Lingen as Targets of Opportunity (TOs).
244 B-24s are dispatched to Achmer and Handorf Airfields; 11 hit Achmer Airfield and 203 hit Diepholz, Verden and Hesepe Airfields and Lingen; they claim 5-6-4 Luftwaffe aircraft; 3 B-24s are lost, 1 damaged beyond repair and 6 damaged; casualties are 3 WIA and 31 MIA.
2nd Bomb Division lost a total of 3 aircraft and 1 was damaged beyond repair. The division also had 14 men killed in action, 17 men were taken as prisoners of war and 3 were wounded in action. 9 men were rescued from the North Sea by ASR.
3rd Bomb Division (13th, 45th, 4th and 93rd Combat Wing) 281 B-17s from: 94BG; 95BG; 96BG; 100BG; 385BG; 388BG; 390BG; 447BG; and 452BG are dispatched to bomb the airfield at Diepholz and Brunswick City. 175 are effective on Diepholz and Brunswick City; 88 aircraft are effective on the industrial areas of Hannover and the airfields at Alhorn and Vörden as Targets of Opportunity (TOs).
281 B-17s are dispatched to Diepholz Airfield and Brunswick; 175 hit the primaries and 88 hit Alhorn and Verden Airfields and Hannover; they claim 2-5-2 Luftwaffe aircraft; 5 B-17s are lost, 3 damaged beyond repair and 36 damaged; casualties are 20 KIA, 4 WIA and 57 MIA.
3rd Bomb Division lost a total of 4 aircraft, 3 were damaged beyond repair and 1 crash landed. Beside the aircraft 40 men were killed in action, 21 men were taken as prisoners of war and 4 were wounded in action.
The escort groups lost a total of 5 aircraft (2 P-47s and 3 P-51s) and 3 were damaged beyond repair (1 P-38 and 2 P-47s). The escort groups also had 2 P-47 pilots and 3 P-51 pilots missing in action.
It is no457th Bomb Group track chart from February 21st 1944t known how many German aircraft were destroyed or damaged on the ground in these strikes, but damage to facilities runways and flak batteries was extensive.
MISSION NARRATIVE 457th Bomb Group
 457th Bomb Group track chart from February 21st 1944
During the months of January and the beginning of February more planes and men arrived at Glatton. Most of the arriving planes were first send to Burtonwood for the latest modifications and crews were send on training missions. On February 14th 1944 the group was supposed to fly it’s first mission but it was scrubbed.
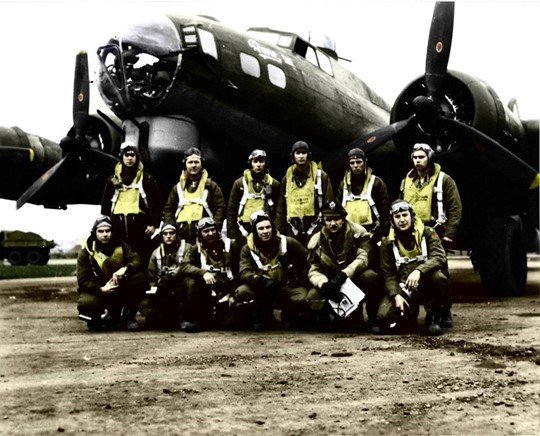
Colonel Luper, Captain Frances, Captain Dickinson, Captain Watson and Captain Spencer had been flying as observers on operational missions with other groups so the men already knew a little bit what is was ‘ all about’. On February 21st the group finally got the change to find out for themselves.
The mission of our group should be divided in two parts because our group flew in two formations, the A formation and the B formation. Our group dispatched a total of 36 bombers who would all be flying in the High Box of their designated Combat Wings.
Lead crew
A FORMATION
The A formation consisted of 19 bombers and took off at (taxi time 1009 and take off 1019) 10.43 hours and set course for Denethorpe, UK, to join their assigned Combat Wing. When they arrived at Denethorpe at 11.19 hours the group made two 360 turns. On the last turn, they saw the Combat Wing they needed to join, this was the 94th Combat Wing (CBW). The A formation was led by Colonel Luper with Lt. J.L. Smith as lead pilot. As always Colonel Luper was flying ‘his’ B-17 Rene III, 42-38113. Lead navigator for the A formation was captain R.D. Newcomb. The group formation bombardier was captain J.C. Mattison.
V.H.F. (Very High Frequency) call sign: Ragweed green
Squadron Call Signs:
748th: R/T Warmkit 749th: R/T Carsmash
750th: R/T Richpurse 751st: R/T Winedrink
The A formation tried to assemble with the 94th Combat Wing but lost them near Spalding, UK, and continued on their briefed route. At 12.00 hours they were flying north of Kings Lynn and again tried to find their Combat Wing. They knew in sight where their Combat Wing should be but could not find it due to the fact that there were many other Combat Wings forming and flying in the area. The group continued their briefed route again and left the coast at Crommer at 12.16 hours and still hadn’t found their Wing leader. The group finally spotted the 41st Combat Wing and were able to merge with them as they were missing their High Box. The designated target for the 94th Combat Wing was Gutersloh in Germany (Target GU 4109 intelligence order no. 287: target has mainly the fighter version of the JU88 with some ME 410’s and ME 210’s), the designated target for the 41st Combat Wing was an Airdrome near Hamm in Germany. The group reached the Dutch coast, near the town of Egmond, at 13.16 hours on their briefed route and continued to the target area. There was a solid 10/10 undercast over the target area so the group turned north to where they knew they could find a target of opportunity. When the Wing Leader dropped on a target of opportunity in the target area, twelve of our crews released a total of 144 bombs. The Group Leader with six other planes of the 457th group held their bombs, and failing to find a better target, returned to the Glatton.
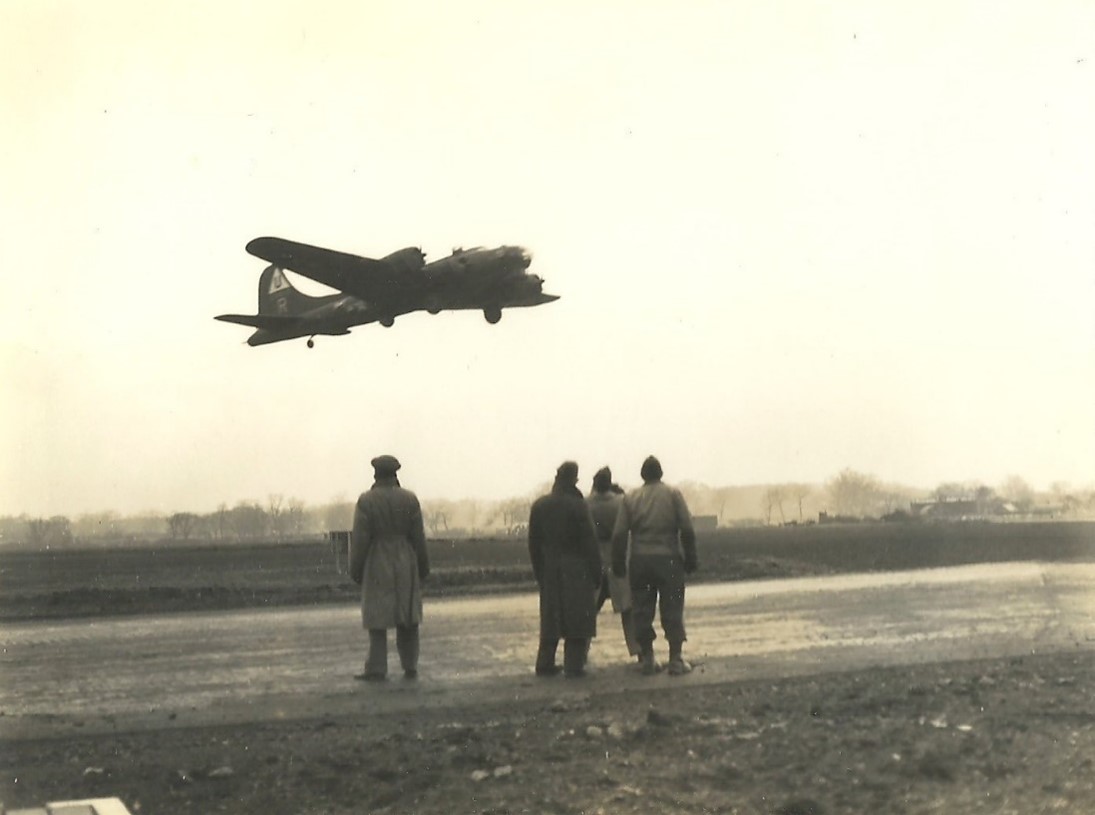
A/C taking off for the first 457th BG mission
After the mission a report was send to the Headquarters of the 94th Combat Bombardment Wing, Station 110 at Polebrook UK. In the report were all the malfunctions that the A formation encountered while one this mission:
- Spark plug on #3 engine vibrated in half; 1 A/C
- Faulty rocker box covers on #2 engine; 1 A/C
- Ball turret oxygen recharger line broken; 1 A/C
- 5 shoes burned out
- 1 electrical suit burned out
B FORMATION
The B Formation consisting of seventeen aircraft with target Lippstadt (Target GU – 4023 intelligence order no. 287: target is a storage of FW 190’s and ME 109’s). Major Henry B. Wilson, Deputy Group Commander, led the B Formation with Lt. Vinton H. Mays as pilot. The B formation lead navigators were Lt. J. English and Lt. A.N. Hoffman. The B formation bombardier was Lt. L.T. Balanger.
V.H.F. (Very High Frequency) call sign: Ragweed green
Squadron Call Signs:
748th: R/T Warmkit 749th: R/T Carsmash
750th: R/T Richpurse 751st: R/T Winedrink
The group took off (taxi time 0954 and take off 1004) at 10.28 hours and set of to Splasher #4 where they made assembly with the 94th “B” CBW. At 13.17 hours the formation picked up the first escort fighter’s (P-47’s) over the enemy coast. The flight was uneventful and after taking bombing interval the target was completely overcast and prevented the B Formation, flying the high box of the 94th B Combat Wing, from dropping bombs as no PFF (radar equipped) aircraft was provided. The Formation leader swung towards the A formation target area searching for a target of opportunity. Finding none, the formation jettisoned bombs in the North Sea, a short distance from the Dutch Coast at around 15.00 hours.
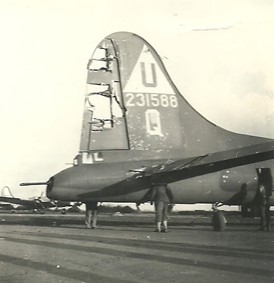
The plane (42-31588) of Lt. Edward B. Dozier, who was to become one of the 457th’s lead pilots, was attacked by four enemy fighters and was shot up so badly it had to be salvaged. The entire tail was badly damaged. Practically all the controls were gone, the oxygen system was out and the communications system was gone.
In spite of the riddled condition of the ship, Lt. Dozier brought the plane back, making a good landing. Both A/C 42-31596 and A/C 4231588 belonged to the A formation. The tail gunner, Sgt. Hyman Kaib, and the waist gunner, Sgt. Dwight Anderson, were credited with downing an FW-190. The radio operator, Sgt. Seymour Pliss, died from flak wounds.
Lt. Dozier later was awarded the Distinguished Flying Cross for the courage, coolness, expert skill and superior airmanship he displayed.
After the mission a report was send to the Headquarters of the 94th Combat Bombardment Wing, Station 110 at Polebrook UK. In the report were all the malfunctions that the A formation encountered while one this mission:
- 1 oxygen regulator flow indicator blew up
- 1 oxygen regulator flow indicator wavering
- #3 propeller governor oil leak; 1 A/C
- 1 right waist gun trigger bar bent
- 4 electrical shoes burned out
- 2 electrical gloves burned out
- 1 electrical suit burned out
- 1 electrical suit too hot and cold
ENEMY RESISTANCE
S-2 Group Officer Charles P. Nelson send a Telephone Report to the commanding General of the 94th Combat Bomb Wing informing them that ‘meager FLAK was encountered at the enemy coast coming in. Also FLAK was encountered over the target area. Although the FLAK was fairly accurate for height it was poor on deflection. The enemy fighter opposition was light and ineffective. Estimated numbers seen varies from 25 to 50; mostly FW-190’s and Me-109’s.
The 457th Bomb Group made 5 reports claiming enemy fighters. Four were made by the 750th squadron and one by the 748th squadron:
Sgt. E. Jones (tail gunner 750th BS): claimed a FW-190/good claim
Sgt. Hyman Kaib (tail gunner 750th BS): claimed a FW-190/claim well observed
Sgt. J. de Vaughn (ball turret gunner 750th BS): claimed a Me-109/good claim
Sgt. G. J. Hyink (top turret gunner 748th BS): claimed a FW-190/damaged
Sgt. T. Norton (tail gunner 750th BS): claimed a FW-190/no comments
TARGET
From the ‘Lead Bombardier’s Narrative’: The 41st Wing leader circled to the left and our box took interval in trail behind the low box. We followed in this position until the lead group opened the bomb bay doors. I intended to drop bombs on the wing leader but due to the small town which he used as an opportunity target, my group C.O. wanted to wait for a better one. However, 12 of our aircraft did drop bombs (144 M43 500 pound G.P. bombs) on the wing leader, thinking I had released mine. No synchronized bombing was done by the 457th “A” group. 7 aircraft returned to base carrying 84 M43 500 pound G.P. bombs).
“On the 21st of February 1944, a sunny day, flew against 14.30 about 20 aircraft of type B-17 over Quakenbrück, turned and attacked the airbase from the east with high-explosive bombs. The aiming was poor again, because most bombs fell in nearby meadows and on the railway premises near a signal cabin, which would be recognizable from an aerial photo of the U.S. air force. The airfield was only hit in an area where the repair workshops (now depots). In addition to some wounded 7 civilians were killed in the attack. The number of fallen soldiers is not known and has also never been released. Because the bombs were dropped off target the property damage was kept within limits. The air force also knew this and therefore, once again, came back at 08.04 with greater success.
– Eyewitness Karl-Ernst Harmeier
During the writing of this article I read that Quakenbruck was attacked by the 41st C.B.W. but a couple of other places have been named as possible targets. I am still in the process of finding out the exact target that was bombed. If you have more information please let me know.
B-17’s and crews
A total of 36 B-17’s and crews were dispatched for this mission. Unfortunately there are no Loading Lists from this mission so we have little information about who was flying this historical mission.
All 36 B-17’s that took part in this mission are listed below.
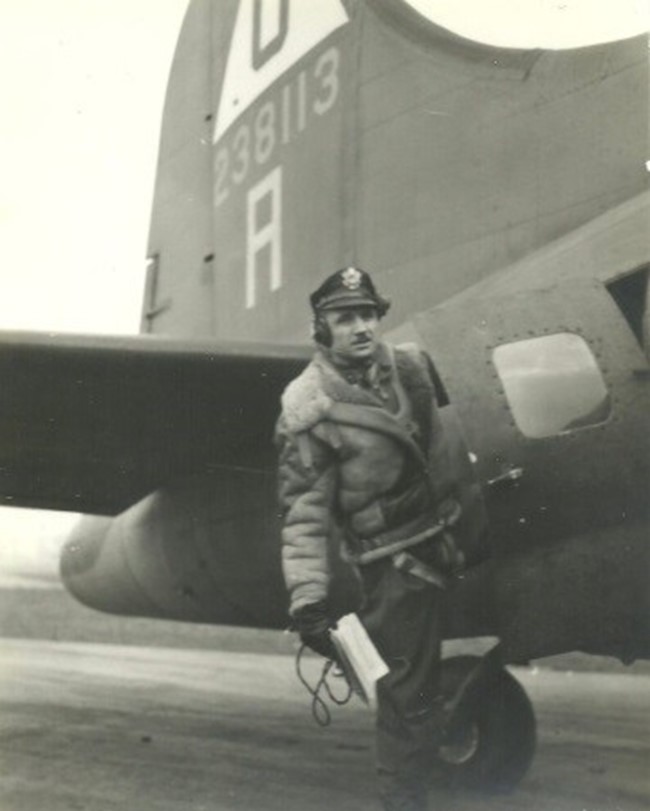
Colonel Luper getting onboard the Rene III
We know all the names of one crew, the Lt. Lew Bredeson crew. This crew was the first 457th Bomb Group crew to be lost in action. Fortunately all but one survived the crash.
Pilot Lt. Llewellyn G. Bredeson – POW
Copilot Lt. George M. Barnes – POW
Navigator Lt. Robert A. Whitby – POW
Bombardier Lt. Samuel L. Kalman – POW
Aircraft Engineer Sgt Howard R Collins – POW
Radio Operator Sgt Leonard V. Luchonock – POW
Left Waist Gunner Sgt. Louis P. Rigaud – POW
Right Waist Gunner Sgt John F. Lewis – POW
Ball Turret Gunner Sgt Walter J. Jutze – POW
Tail Gunner Sgt William H. Schenkel – KIA
| Hi-Box “A” | Hi-Box “B” |
| Lead sqd
A/C #42-38113/”Rene III” Tail: A Pilot: Lt. Smith/Luper 749th Squadron Bomb load: 12 x M43 500 GP bombs 1145 gallons of gas consumed 6.15 hours flown |
Lead sqd
A/C #42-31520 Tail: A Pilot Lt. Wilson/Mays 751st Squadron Bomb load: 12 x M43 500 GP bombs 1358 gallons of gas consumed 7.00 hours flown |
| #2 lead sqn
A/C #42-97464/”What Next” Tail: P Pilot Lt. Lady/Hoffman 749th Squadron Bomb load: 12 x M43 500 GP bombs 1120 gallons of gas consumed 5.15 hours flown |
#2 lead sqn
A/C #42-31505/”Miss Cue” Tail: D Pilot Lt. Watson/Sikkenga 751st Squadron Bomb load: 12 x M43 500 GP bombs 1500 gallons of gas consumed 7.00 hours flown |
| #3 lead sqn
A/C #42-31613 Tail: R Pilot Lt. Bartley 749th Squadron Bomb load: 12 x M43 500 GP bombs 1145 gallons of gas consumed 6.15 hours flown |
#3 lead sqn
A/C #42-31592 Tail: B Pilot Lt. Hauf 751st Squadron Bomb load: 12 x M43 500 GP bombs 1425 gallons of gas consumed 7.00 hours flown |
| #4 lead sqn
A/C #42-31548 Tail: K Pilot Lt. Flowers 749th Squadron Bomb load: 12 x M43 500 GP bombs 1385 gallons of gas consumed 6.50 hours flown |
#4 lead sqn
A/C #42-97481/”Liberty Run” Tail: Q Pilot Lt. Godfrey 751st Squadron Bomb load: 12 x M43 500 GP bombs 1032 gallons of gas consumed 7.00 hours flown |
| #5 lead sqn
A/C #42-31531 Tail: J Pilot Lt. Karl 749th Squadron Bomb load: 12 x M43 500 GP bombs 1380 gallons of gas consumed 5.50 hours flown |
#5 lead sqn
A/C #42-31594/”Sweat’er Out” Tail: G Pilot Lt. Auld 751st Squadron Bomb load: 12 x M43 500 GP bombs 1725 gallons of gas consumed 7.05 hours flown |
| #6 lead sqn
A/C #42-31587 Tail: D Pilot Lt. Parks 749th Squadron Bomb load: 12 x M43 500 GP bombs 1420 gallons of gas consumed 6.40 hours flown |
#6 lead sqn
A/C #42-31615/”Snafusk Shamrock” Tail: N Pilot Lt. Luebke 751st Squadron Bomb load: 12 x M43 500 GP bombs 1032 gallons of gas consumed 6.55 hours flown |
| #7 lead sqn
A/C #42-31633 Tail: S Pilot Lt. Dudek 749th Squadron Bomb load: 12 x M43 500 GP bombs 1400 gallons of gas consumed 8.30 hours flown |
Lead high sqn
A/C #42-97478 Tail: Q Pilot Lt. Johnson 749th Squadron Bomb load: 12 x M43 500 GP bombs 1455 gallons of gas consumed 6.20 hours flown |
| Lead high sqn
A/C #42-31620/”Skunk Hollow” Tail: B Pilot Lt. Selwyn 750th Squadron Bomb load: 12 x M43 500 GP bombs 1630 gallons of gas consumed 6.15 hours flown |
#2 high sqn
A/C #42-38102 Tail: O Pilot Lt. Shepard 748th Squadron Bomb load: 12 x M43 500 GP bombs 1700 gallons of gas consumed 7.05 hours flown |
| #2 high sqn
A/C #42-97468/”Tujunga III” Tail: N Pilot Lt. Lane 750th Squadron Bomb load: 12 x M43 500 GP bombs 1712 gallons of gas consumed 8.25 hours flown |
#3 high sqn
A/C #42-97457 Tail: N Pilot Lt. Bowers 749th Squadron Bomb load: 12 x M43 500 GP bombs 1450 gallons of gas consumed 6.25 hours flown |
| # 3 high sqd
A/C #42-31551/”Elizabeth Ann” Tail: P Pilot Lt. Procoppio 750th Squadron Bomb load: 12 x M43 500 GP bombs 1467 gallons of gas consumed 6.45 hours flown |
#4 high sqn
A/C #42-97470/”Oh Kay” Tail: R Pilot Lt. Seabock 748th Squadron Bomb load: 12 x M43 500 GP bombs 1700 gallons of gas consumed 6.47 hours flown |
| #4 high sqn
A/C #42-31627 Tail: J Pilot Lt. Woolf 748th Squadron Bomb load: 12 x M43 500 GP bombs 1608 gallons of gas consumed 6.30 hours flown |
#5 high sqn
A/C #42-31636 Tail: S Pilot Lt. James 748th Squadron Bomb load: 12 x M43 500 GP bombs 1350 gallons of gas consumed 7.00 hours flown |
| #5 high sqn
A/C #42-38021/”Mission Maid” Tail: K Pilot Lt. Poore 751st Squadron Bomb load: 12 x M43 500 GP bombs 1290 gallons of gas consumed 5.00 hours flown |
Lead low sqn
A/C #42-31630/”Pakawalup” Tail: J Pilot Lt. Brannan 751st Squadron Bomb load: 12 x M43 500 GP bombs 1675 gallons of gas consumed 06.40 hours flown |
| #6 high sqn
A/C #42-31517 Tail: A Pilot Lt. Graves 748th Squadron Bomb load: 12 x M43 500 GP bombs 1278 gallons of gas consumed 6.10 hours flown |
#2 low sqn
A/C #42-38055 Tail: K Pilot Lt. Reppa 748th Squadron Bomb load: 12 x M43 500 GP bombs 1700 gallons of gas consumed 6.30 hours flown |
| Lead low sqn
A/C #42-31591/”Homesick Angel” Tail: W Pilot Lt. Bender 750th Squadron Bomb load: 12 x M43 500 GP bombs 1610 gallons of gas consumed 6.40 hours flown |
#3 low sqn
A/C #42-31552/”My Buddy” Tail: H Pilot Lt. Lee 748th Squadron Bomb load: 12 x M43 500 GP bombs 1750 gallons of gas consumed 7.20 hours flown |
| #2 low sqn
A/C #42-38060 Tail: K Pilot Lt. Morrow 750th Squadron Bomb load: 12 x M43 500 GP bombs 1500 gallons of gas consumed 6.30 hours flown |
#4 low sqn
A/C #42-38103 Tail: P Pilot Lt. Weid 748th Squadron Bomb load: 12 x M43 500 GP bombs 1419 gallons of gas consumed 7.15 hours flown |
| #3 low sqn
A/C #42-31588 Tail: Q Pilot Lt. Dozier 750th Squadron Bomb load: 12 x M43 500 GP bombs 1370 gallons of gas consumed 7.30 hours flown |
#5 low sqn
A/C #42-97458 Tail: F Pilot Lt. Kuhl 748th Squadron Bomb load: 12 x M43 500 GP bombs 1731 gallons of gas consumed 7.25 hours flown |
| #4 low sqn
A/C #42-31629/”Raven’s Nest” Tail: J Pilot Lt. Rogers 750th Squadron Bomb load: 12 x M43 500 GP bombs 1335 gallons of gas consumed 06.15 hours flown |
#6 low sqn
A/C #42-97471 Tail: N Pilot Lt. Johnston 748th Squadron Bomb load: 12 x M43 500 GP bombs 1700 gallons of gas consumed 6.25 hours flown |
| #5 low sqn
A/C #42-31596/”Tail End Charlie” Tail: H Pilot Lt. Bredeson 750th Squadron Bomb load: 12 x M43 500 GP bombs Unknown gallons of gas consumed |
|
| #6 low sqn
A/C #42-97452 Tail: L Pilot Lt. Fischer 750th Squadron Bomb load: 12 x M43 500 GP bombs 1535 gallons of gas consumed 5.15 hours flown |
(500 GP bomb = 500 pound General Purpose bomb)
A total of 5 A/C’s were damaged in the “A” formation and one was lost (#42-31596, Lt Bredeson). 4 A/C’s had major damage and 1 had minor damage. 1 ship was damaged by FLAK, 1 was damaged by FLAF and fighters, 2 were damaged by fighters and 1 was damaged by friendly fire.
Ship #42-31531 had a FLAK hole in the right hand stabilizer forward of the right hand elevator and skin damage.
Ship #42-31633 had a .50 caliber burst going through the left hand stabilizer and left hand elevator necessitating change of both stabilizers and elevators. One .30 caliber hole in the right hand inboard wing panel between No. 1 and No. 2 nacelles damaging the main stringer passed through the wing toward leading edge and entered No. 1 nacelle severing the oil and gas lines. One .30 caliber bullet glanced off No. 1 nacelle causing skin damage only.
Nacelle: is a housing, separate from the fuselage, that holds engines, fuel, or equipment on an aircraft.
Ship #42-31620 had one 20mm hole in the left wing entering leading edge of station No. 29 and emerged on the upper surface of the wing at station No. 26 of front spar. One .50 caliber hole in the left wing between stations No. 16 and 17 in front of rear spar causing hole through Tokyo tank cell No. 7, the shell exploded bulging the lower surface of the wing between stations No. 18 and 19 just before rear spar. Small FLAK hole between stations No. 23 and 24 before rear spar damaging rib.
Spar: is a beam which takes the load along the wing, from wing tip to fuselage.
Ship #42-97452 had one 20mm hole through the flaps between station No.8, 9 and 10 trailing edge extended on up through the wing emerging on upper surface at same station damaging four ribs of flap, rear spar and three wing ribs.
Ship # 42-31588, piloted by Lt. Dozier, was one of the ships which sustained major damaged. The ship was riddled by 20mm holes: there was a 3 x 3 feet hole in the fuselage between stations 9 and 10, numerous holes in the top of the fuselage, in both bomb bay doors and in complete underside of fuselage (all stations). The vertical stabilizer, elevator, bulkheads, conduit control cables, rudder cable and bomb racks were severely damaged by 20mm shell explosions. The tail gun position was hit hard. The plexiglass window was shattered by 20mm explosion and there was a hole in the tail gun escape hatch, tail gunner Sgt. Seymour Pliss was killed in action.
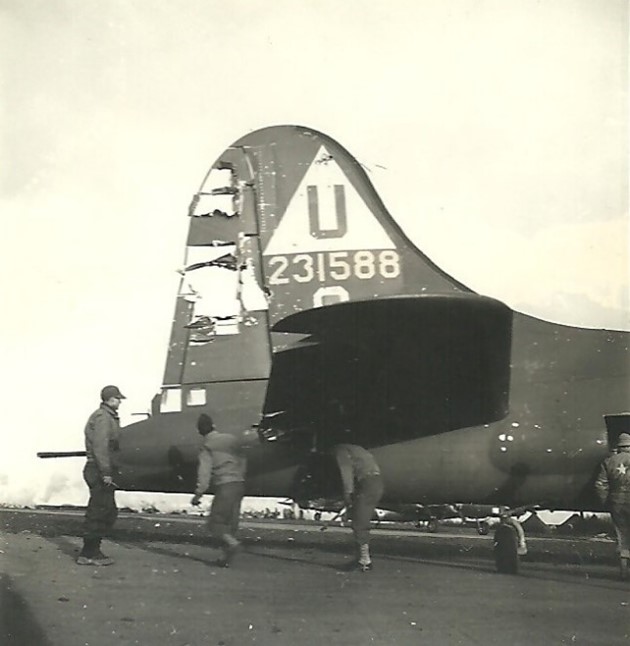
Heavily damaged tail of A/C #42-31588
A total of 2 A/C’s were damaged in the “B” formation, both sustained minor damage.
Ship #42-38103 had a FLAK hole in the top of cowling No. 1 nacelle, one hole (shell case) in leading edge of left hand inboard wing panel going through deicer shoe between No. 1 and 2 nacelles.
Ship #42-97471 had three shell case holes in the top of the right hand inboard wing panel just right of the fuselage, one FLAK hole in left hand inboard wing panel near connection forward of trailing edge, one FLAK hole underside left hand outboard wing panel forward of the left hand aileron.
Aileron: is a hinged flight control surface usually forming part of the trailing edge of each wing of a fixed-wing aircraft. Ailerons are used in pairs to control the aircraft in roll.
PRISONERS OF WAR
“As Tail-end Charlie, “we caught the full brunt of the attack. On a pass they shot up the cockpit, virtually destroying it. The noise of the engines, out of sync and running away, along with the exploding 20mm shells was horrendous. The engine’s vibrations were shaking the ship apart. What the hell, the ship was on her last legs. During all the din, I sensed rather than heard the bail-out bell.” – Lt. Samuel Kalman
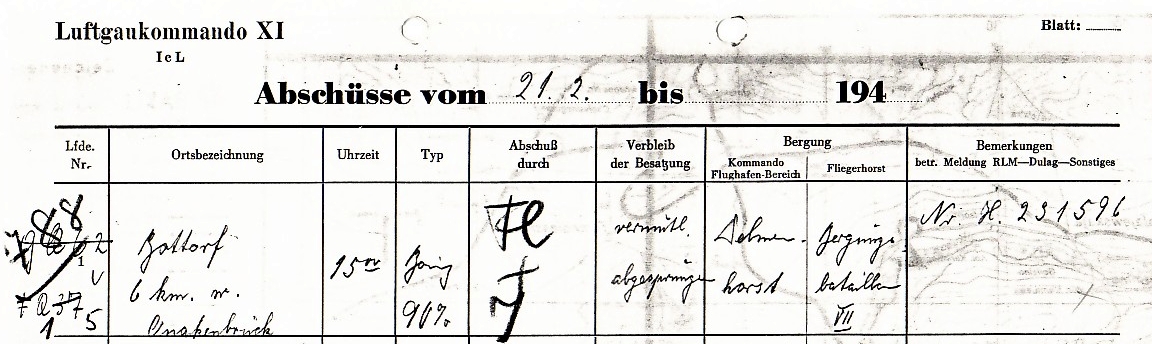
When the crew bailed out the ship continued to fly before crashing flat in a field just outside the German town of Bottorf. The exact location was shown to mister Volker Urbansky in 2013 by a man who witnessed the crash as a child. The only other thing the eye witnessed could remember was blood on one of the escape hatches.
What we do know about the crew is from the MACR (Missing Air Crew Report, NO. 3004, available on our website) of the Lt. Bredeson crew. In the report radio operator Pvt. Leonard V. Luchonok tells the investigators that “navigator Lt. Robert A. Whitby had slight injuries, top turret gunner Sgt. Howard Collins was wounded to his shoulder and hand by fragments from the top turret, right waist gunner Sgt. Louis Rigaud sprained his ancle after landing with his parachute and left waist gunner Sgt. Walter T. Jutze had a fragment in his eye which was later taken out”.
All the crew members were caught by the Germans and taken to a small room in a tavern in the German town of Damme. Navigator Lt. Robert A. Whitby continues: “Co-pilot George M. Barnes complained about back problems as did the radio operator Pvt. Leonard Luchonock”.
All men were taken to POW camps across Germany.
KILLED IN ACTION
Lest we forget
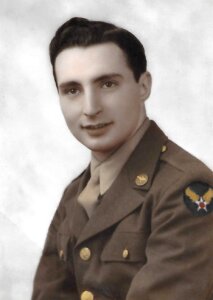
Seymour C. Pliss
1924 – 1944
Sgt. Seymour C. Pliss died when he was hit by FLAK on the badly damaged bomber flown by pilot Lt. Edward B. Dozier. His death, as we see many times, left a huge scar on those back in the States which is still felt 75 years later. Seymour’s father passed away and he was now the only breadwinner, taking care of his mother and teen sister. Although he enlisted voluntarily his mother and sister always felt that he shouldn’t have been accepted by the Air Force because he was the only breadwinner. His mother nor his sister ever talked about Seymours death as it was just to painfull. Thanks to the hard work and research Janet Garzia did for us we were able to find the family of Seymour. His great niece provided us with a photo of Seymour. We thank the family of Seymour Pliss for this.
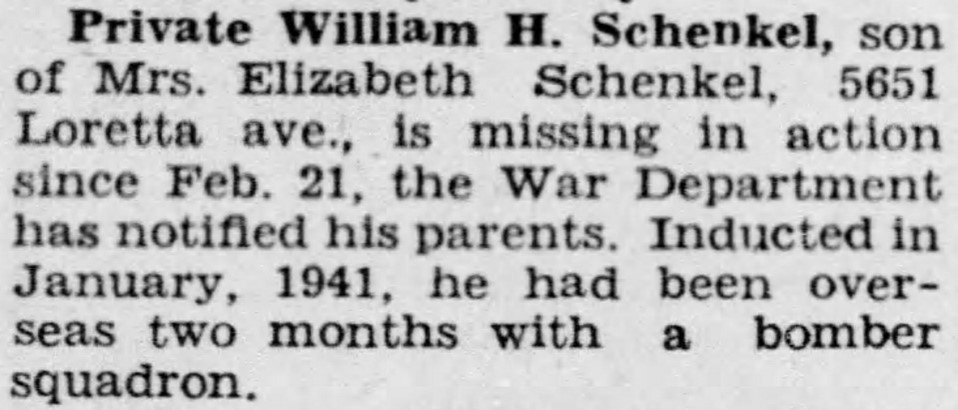
William H. Schenkel
1923 – 1944
“S/Sgt. William H. Schenkel, the tail gunner of my crew, died a hero’s death.
Except there was no one there to see it. He died alone in a German farmer’s field somewhere in enemy territory”
– Lt. Samuel Kalman
William ‘Bill’ Schenkel was born on May 4th 1923. When their ship was under attack the tail was hit hard and an exploding 20mm shell probably caused his mortal wounds. He managed to get himself into the waist, although there is a report that someone dragged him from the tail, and was taken care of by other crewmembers. A crewmember remembers he asked the guys to put on his parachute and throw him out by static line but others remember that he was dazed and too weak to pull the rip cord. He tried to tell them something but they couldn’t understand what he was trying to say. He was bleeding badly from a wound in his abdomen and one near his arm/shoulder. Walter Jutze and Louis Rigaud (John Lewis is also mentioned) managed to get his parachute one, hooked him up to the static line and threw him, at 20.000 feet, from the main escape hatch. They saw the chute open and hoped that he would be helped on the ground by the Germans. When they surviving crewmembers were interviewed, after the war, for the missing air crew report they said that they were over German country side and that help might have come too late for him. He was bleeding so badly that some thought that he might have died before hitting the ground.
Documentation
MACR #3004, NARA
457th Mission Report February 21st 1944, NARA
Black Puff Polly, Roland O. Byers
457th Bomb Group Association archives
The Pliss family